Thursday, June 7, 2012

NetSpeedMonitor (what it says)

These days, even the most powerful PC is not of much use without a solid Internet connection. And even if your connection is great, do you know how much data you consume, and at what rates? And can you tell which applications are connecting to the Internet, and where they're connecting to? NetSpeedMonitor is a small, unobtrusive donationware utility that can help you answer all of these questions.
NetSpeedMonitor tooltip screenshot
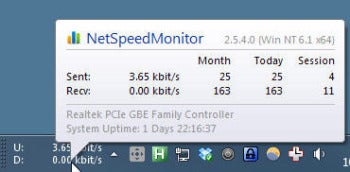
NetSpeedMonitor displays a stylish, custom tooltip showing connection performance and metrics.Unlike Casper Bandwidth Monitor and other monitoring applications, NetSpeedMonitor doesn't use a window--nor does it silently sit in the system tray. To display connection speeds, NetSpeedMonitor creates a new toolbar for the Windows taskbar. This toolbar sits next to the system tray (where the clock and the tiny icons reside), and displays download and upload speeds. The default display is wide and did not work well with my vertical taskbar. A quick visit to the configuration dialog, accessible by right-clicking the toolbar, fixed that. I was able to reduce the labels and make the counter fit nicely even in a vertical taskbar.
NetSpeedMonitor connection screenshot
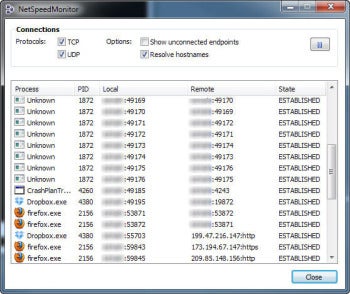
NetSpeedMonitor can show which processes on your system use TCP and UDP connections, and where those connections lead.When you hover the cursor over the toolbar, NetSpeedMonitor shows a custom pop-up with the current upload and download bitrates (which you can see on the toolbar anyway), as well as monthly, daily, and session transfer tallies, so you know how many bytes you uploaded and downloaded over those time spans. This pop-up is well-designed, but the data tallies are not followed by any unit count, so you will have to guess whether "32" means 32KB, 32MB, or 32GB. If you're not sure which one it is, you can find out by right-clicking the toolbar and clicking Data Traffic. This opens a dialog where you can see those tallies again, and configure the unit used (MB, by default). The popup worked well when my taskbar was in the horizontal position, but it flickered badly when I tried to use it with a vertical taskbar.
NetSpeedMonitor toolbar customization screenshot
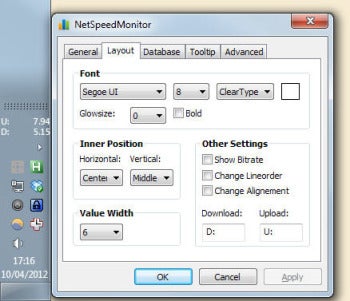
NetSpeedMonitor's toolbar can be customized so it takes up minimal horizontal space, and works well with vertical taskbars.Apart from the configuration and Data Traffic dialogs, NetSpeedMonitor has one more dialog: Connections. This is the most technical of all three dialogs, and it shows a list of running processes which have established, listening, or closed TCP and UDP connection endpoints. Basically, it shows you a list of applications who are trying to go online, as well as where these applications are trying to connect. The list is a bit tricky to use, because some of the processes are marked as Unknown; NetSpeedMonitor can't find their name. It does, however, report their PID (process ID), and you can then run Process Explorer or Task Manager and find what process that PID belongs to. In my case, it was CrashPlan, and I could see its PID only after I elevated Task Manager to show processes from all users.
While the Connections dialog is mainly useful for developers and/or very technical users, the rest of NetSpeedMonitor is easy, fast, and friendly. NetSpeedMonitor is offered for free, but its developer accepts donations for his work.
--Erez Zukerman

http://www.pcworld.com/downloads/file/fid,207895/description.html#tk.nl_ddx_h_dlfeat

http://www.floriangilles.com/software/netspeedmonitor/download/
 

Monday, June 4, 2012

Speedbox - speedometer app


Description

Speed Box Free is a free speedometer for the iPhone, that uses the same refined algorithms as our paid application "Speedbox".
SpeedBox Lite is a free Speedometer for your iPhone. See your speed in km/or mph and switch between different modern and classical speedometer graphics.
The Lite version uses the exact same refined algorithms, that make our commercial GPS products so accurate. 

Screenshots

iPhone Screenshot 1
iPhone Screenshot 2
iPhone Screenshot 3
iPhone Screenshot 4

http://itunes.apple.com/us/app/speedometer-free-speed-box/id307529605?mt=8

How To Anonymise Your BitTorrent Traffic With BTGuard

If you’re using BitTorrent without taking special measures to hide your activity, it may be just a matter of time before your ISP throttles your connection, sends you an ominous letter, or you find yourself the target of a file-sharing lawsuit. Here’s how to set up a simple proxy to keep your torrenting safe and anonymous.We’ve talked about how to boost your BitTorrent privacy before, but those measures aren’t quite enough anymore to keep you anonymous, because copyright holders are getting more vigilant at tracking down people who share their content. Heck, you don’t even need to be doing anything illegal, either. Maybe you just want to keep Big Brother out of your business and stop your ISP throttling your connection. Either way, if you really want to keep your activity private, your best bet involves routing your BitTorrent connection through an external service. BTGuard is a BT-focused proxy server and encryption service, and it’s my service of choice. Below, I’ll explain what it does, how it works, and how to set it up to privatise and anonymous your BT traffic.

How BTGuard Works

When you download or seed a torrent, you’re connecting to a bunch of other people, called a swarm, all of whom — in order to share files — can see your computer’s IP address. That’s all very handy when you’re sharing files with other netizens, but file sharers such as yourself aren’t necessarily the only people paying attention. Piracy monitoring groups (often paid for by the entertainment industry either before or after they find violators) also join BitTorrent swarms, but instead of sharing files, they’re logging the IP addresses of other people in the swarm — including you — so that they can notify your ISP of your doings. A proxy (like BTGuard) funnels your internet traffic — in this case, just your BitTorrent traffic — through another server, so that the BitTorrent swarm will show an IP address from a server that can’t be traced back to you instead of the address that points to your house. That way, those anti-piracy groups can’t contact your ISP, and your ISP has no cause to send you a harrowing letter.
But wait, can’t the piracy groups then go to the anonymiser service (BTGuard) and requisition their logs to figure out that you’re the one downloading the new Harry Potter? Theoretically, yes, but the reason why we chose BTGuard is because they don’t keep logs, so there’s no paper trail of activity leading back to you. All the piracy monitors see is BTGuard sharing a file, and all your ISP sees is you connecting to BTGuard — but not what data you’re downloading, because it’s encrypted.
If you subscribe to an ISP that throttles BitTorrent traffic and aren’t using an anonymiser service, you have an additional problem. Your ISP can still see what you’re doing, and if they detect that you’re using BitTorrent — even if you’re using it for perfectly legal purposes — they may throttle your connection so you get unbearably slow speeds. When you encrypt your BitTorrent traffic, your ISP can’t see what you’re using your connection for. They’ll see that you’re downloading lots of information, but they won’t be able to see that it’s BitTorrent traffic, and thus won’t throttle your connection. You still have to be careful of going over your ISP’s bandwidth cap, however, if that exists.
BTGuard offers you both a proxy (to combat spying) and encryption (to combat throttling) — though many torrent clients have encryption built-in as well.
Sounds great, right? Now the caveats: First, BTGuard isn’t free. At $US7/month (as little as $US5 if you pay for a year in advance), it isn’t very expensive, and we think it’s well worth it if you want to torrent anonymously. A lawsuit settlement, if it comes to that, will cost you at least a couple thousand dollars, which equals a couple of decades of BTGuard subscriptions, so keep that in mind, too. The other potential downside is that piping your downloads through another service may decrease your upload and download speeds. How much depends on what torrent you’re downloading, who from and a lot of other factors, but just know that it’s a possibility.
Lastly, proxies aren’t supported by every client, which means you’ll have to use one with more advanced features. uTorrent (for Windows) and Vuze (for Windows, Mac and Linux) both support proxies, but sadly Mac and Linux favourite Transmission does not. (If you’re absolutely stuck with a client that doesn’t support proxies, check the end of this article for some alternative solutions to the anonymity problem.)

How to Set Up BTGuard

BTGuard has a one-click install process, but we’re going to show you how to do it the manual way, since it works in any BitTorrent client that supports SOCKS5 Proxy — not just the ones supported by BTGuard’s installer. It’ll also give you a better sense of what exactly BTGuard does, so if you run into problems, you’ll have a better idea of how to fix it.

Step One: Sign Up for BTGuard

First, sign up for an account over at BTGuard.com. It’ll just take a minute, and then you can get to configuring your client. Their BitTorrent proxy service costs $US6.95 a month, but you can get discounts by buying multiple months at a time (up to a year’s service for $US59.95). Once you’re done, you should receive an email telling you that BTGuard is ready to go.

Step Two: Configure Your Client

Next, open up your torrent client of choice and find the proxy settings within its preferences. In uTorrent, for example, this is under Preferences > Connection. Your client may have them in a different place (Google around to find out where), but no matter your client, your settings should look like this:
  • Proxy Type: Socks v5
  • Proxy Host: proxy.btguard.com
  • Proxy Port: 1025
  • Username: Your BTGuard username
  • Password: Your BTGuard password
You’ll also want to make sure you’re using the proxy for hostname or tracker lookups as well as peer-to-peer connections, so check all boxes that say anything like that. You’ll also want to disable connections or features that could compromise the proxy, so check all the boxes under uTorrent’s “Proxy Privacy” section, or anything similar that your client may have. Hit Apply, exit the preferences and restart your client. Your proxy should now be active.

Step Three: See If It’s Working

To ensure that it’s working, head over to CheckMyTorrentIP.com. This site can tell you what your IP address is, and compare it to the IP address of your torrent client, which will let you know whether your proxy is working correctly. To test it, hit the “Generate Torrent” button, and open the resulting torrent in your client. Then, go back to your browser and hit the Refresh button under the “Check IP” tab. If it’s the same as your browser IP — which you’ll see next to the Refresh button — then your proxy isn’t working, and you’ll want to double-check all of the above settings. If it shows a different IP address (often from another country like Germany or Canada), then BTGuard is successfully tunnelling all your traffic for you.

Step Four (Optional): Enable Encryption

If you want extra security (or if you’re trying to protect your connection from being throttled), you’ll also want to encrypt all that traffic. Many clients have this feature built-in. In uTorrent, for example, just head to Preferences > BitTorrent and look for the “Protocol Encryption” section. Change your outgoing connection to Forced encryption, and uncheck the “Allow incoming legacy connections” box. From there, you should be good — your ISP shouldn’t throttle your connection after this is enabled.
If your client doesn’t support encryption, or you want a more powerful encryption behind your torrenting, BTGuard offers an encryption service as well. Just head to their Encryption page, download the software, and install it to C:\BTGUARD (this is very important; don’t change the installation directory). Then, start the BTGuard Encryption program (accessible from the Start menu), and open up your BitTorrent client. Change your proxy server from proxy.btguard.com to 127.0.0.1, restart your client, and you’re golden. Again, this isn’t necessary if your client already supports encryption, but it is an extra layer of protection if you really want to keep everything private.

Other Alternatives

Lastly, while this is our preferred BitTorrent privacy solution, it won’t work for everyone. For example, if you’re stuck with a specific client that doesn’t support proxies, you’ll need something different. Here are a few of your other options:
A full VPN: If your client doesn’t support proxies, you’ll want a full VPN service that anonymises all your traffic, not just BitTorrent. You can use one of these great VPN services to protect your traffic, but it’s likely you could still experience speed decreases — though this time, they’ll affect all your browsing. If you only use it when torrenting, that’s fine, but this isn’t good for those that want to seed those torrents afterwards. You should also make sure that the VPN service you choose doesn’t keep logs of your activity, because if they do, that defeats the purpose of using them at all.
A Seedbox: If you want to contribute back to the community (or if you’re on a private tracker that requires you seed to a certain ratio), you’ll want to try a seedbox. A seedbox is essentially a dedicated server in another country that does all the torrenting for you, using their very high speed connection. Once a torrent is downloaded, you can then connect to your seedbox via FTP or something similar and download your files from them that way. It’s more expensive than a simple proxy (ranging from entry-level boxes at $US10 or $US20 a month to fast boxes with more storage at $US50 or even $US100 a month), but it allows you to keep seeding at very high speeds. There are a lot of good seedbox providers. Bytesized and ExtremeSeed come highly recommended, but a bit of searching can probably find you a lot of different options. Shop around and see which one’s best for you.
Usenet: Your last alternative is to try a new file-sharing service entirely, like Usenet. It offers encrypted connections and doesn’t connect to peers, so others can’t track what you’re doing. It doesn’t always have the selection that BitTorrent has (depending on what you’re downloading), but it offers a ton of other advantages, most notably higher speeds and more privacy. Check out our guide to getting started with Usenet to see if it’s right for you.
BitTorrent isn’t the safe place it once was, and if you’re going to use it to share and download files, we highly recommend getting some sort of protection from the services above so you can avoid DCMA notices and throttled speeds.Got any other tips for keeping your file sharing on the down low? Share them with us in the comments.

http://www.lifehacker.com.au/2011/11/how-to-anonymise-your-bittorrent-traffic-with-btguard/

What Kind Of Maintenance Do I Need To Do On My Windows PC?

Maintenance You’ll Want to Do

Update Windows

 We’ve said it before, and we’ll say it again: Don’t neglect Windows Update. Install updates when it gets them, and restart your computer if necessary. This will keep your computer safe and stable, and really takes no effort on your part.


Run Microsoft Security Essentials:

 It’s a sad fact of life, but if you’re using Windows, you’ll probably want some form of antivirus software running in the background. There’s no need to pay for antivirus, though — Microsoft Security Essentials is pretty great on its own. Of course, the best defence against malware is safe browsing, so the more responsible you are, the better off your computer will be — antivirus or no antivirus.

Back Up Your Hard Drive

Whether it’s the simple Windows Backup or an automated, offsite backup tool like our favourite Crashplan, backups are essential tools for any PC user. It isn’t maintenance, per se, but it can get you out of quite a few binds, so we can’t recommend it enough.

Clean Temporary Files with CCleaner:

 Windows can leave a lot of clutter and temporary files lying around your hard drive, and it’s a good idea to clean these up regularly. We’ve sung the praises of CCleaner many times before, and with good reason. Just set it up to run automatically on a schedule, and you’ll keep your computer free of all the temporary clutter.

Uninstall Programs with Revo Uninstaller

Windows’ Add/Remove Programs dialog is OK, but Revo Uninstaller is even better. Not only does it remove every trace of an application from your computer, but it also helps you uninstall apps you can’t find, as well as manage your startup processes which will help you boot up faster and run smoother once you do.

Maintenance You Don’t Need to Do

Defragment Your Drive (Unless You’re On Windows XP)

One of the maintenance operations people always talk about is defragmenting your hard drive. Times have changed, however, and this isn’t actually necessary. Windows Vista and 7 automatically defragment your drive, so there’s no need to do it yourself. If you’re on XP, however, you’ll still want to defragment, and you can just set Disk Defragmenter to run on a schedule. Note that if you have a solid-state drive, you don’t want to run Disk Defragmenter — whether you’re on XP or not. SSD’s don’t need it (but they will need TRIM enabled).

Clean Your Registry

You’ve probably also heard about registry cleaners before, but the fact of the matter is that they probably won’t do much to help your computer. They won’t cause harm to your computer, but you’re very unlikely to get any kind of results. Leave these ones alone.

Mess with Windows Prefetching

You may have seen a few articles around the net on cleaning out Windows’ prefetching to speed up your computer, but it’s pretty much a myth. Not only will you not see any performance gains, but you could actually cause more problems instead of solving them. Just leave prefetching alone; Windows has it there for a reason.

Regularly Reinstall Windows:

 Sometimes it’s unavoidable, but as long as you’re responsible about what you install, there’s no reason you need to reinstall Windows every six months. Be careful about what you download, test new programs in a virtual machine, and run the maintenance tools we mentioned in section one, and you should be able to save yourself a few hours every month.
That’s our short list of Windows maintenance tools, but it should get you started. We’ve gone through a much more detailed list of Windows maintenance tips, but these are pretty much the essentials here, so they should keep your computer running in tip-top shape for awhile. Check out our more detailed list for an in-depth look.

http://www.lifehacker.com.au/2011/06/ask-lh-what-kind-of-maintenance-do-i-need-to-do-on-my-windows-pc/