Wednesday, February 22, 2012

Shut Down Windows Without Installing Updates


Has this happened to you? You're sitting at your laptop, typing away, when you glance at the clock and realize it's time to go. So you shut down Windows--only to be informed that it needs to install some updates first. Ten minutes later, you're still waiting for the job to finish--effectively held hostage by your operating system.
That, my friends, is a hassle with a capital H.
How hard would it be for Microsoft to add a deferment, an "install updates later" or "not right now" option? This whole thing about forced updating during shutdown is borderline insulting.
Fortunately, if you see the little update-alert icon alongside the Shut Down button, there's a simple way to bypass it. Here's how:
  1. Shut down all your programs so that only the desktop remains.
  2. Press Alt-F4.
  3. Click the pull-down menu, and change it from Install updates and shut down to simply Shut down.
  4. Click OK.
Presto: Windows shuts down straight away, without installing any updates. That'll teach you to take me hostage, Microsoft!
Actually, once you get in the habit, you might find pressing Alt-F4 a quicker and more preferable way to shut down your PC. One less mouse click!
If you've got a hassle that needs solving, send it my way. I can't promise a response, but I'll definitely read every e-mail I get--and do my best to address at least some of them in the PCWorld Hassle-Free PC blog. My 411: hasslefree@pcworld.c


http://www.pcworld.com/article/249992/put_linux_on_a_usb_drive_bypass_windows_updates.html#tk.nl_sbx_h_cbintro

Put Linux on a USB Drive


A flash drive is one of the single most useful tools a person can own. With it you can back up critical data, transport large files, rescue a malware-infested PC, and even run an entire operating system. Regarding this last option, a while back I explained how to put Windows 8 on a flash drive. (It works with Windows 7, too.) Today, let's talk about putting Linux on a flash drive.
Why would you want to do that? Two reasons: to see how the other half lives, so to speak, and to create a rescue tool that can work around nearly any Windows-related disaster.
For example, I recently spent days troubleshooting a relative's malware-infested, effectively non-operational laptop. She wasn't concerned about getting the system working again, but she desperately wanted to retrieve her business documents, personal photos, and the like. (I did not, you'll be glad to know, take the opportunity to scold her about making backups. I waited until later.)
Just because Windows is hosed doesn't mean you can't access the files on your hard drive. By booting Linux from a flash drive, you get a full-blown operating system, one that can read the main drive and, usually, copy its contents somewhere safe (like the cloud, an external hard drive, or even a network drive).
Okay, but you don't have a master's degree in programming, so how are you supposed to create this mythical Linux boot drive? It's easier than you might think thanks to an open-source utility called UNetbootin. The beauty of this tool is that it does everything for you (except supply the flash drive--I recommend something like the Kingston DataTraveler 108 8GB drive, which Newegg sells for the amazingly low price of $8 shipped).
Just download and run the program, then choose a Linux distribution (i.e., a version of Linux) or, if you already have one, an ISO file. I think most people will opt for the former, at which point UNetbootin downloads Linux for you, then copies it to your flash drive (and makes the drive bootable).
If you're new to Linux, I recommend choosing Ubuntu--though readers may have other ideas as to which distribution is the most user-friendly.
Reboot with your drive still inserted and presto: Linux should load. (You may need to monkey with your BIOS or boot settings so that the flash drive is at the top of the order.)
Keep in mind that this won't overwrite anything on your hard drive; the OS runs exclusively from the flash drive. When you're done, you can just shut down, remove the drive, then boot back into Windows normally. But I recommend familiarizing yourself with that Linux environment, just so you're prepared if and when you need to use it for rescue purposes. Plus, it's kind of fun!

Monday, October 31, 2011

How to install Windows 8 (or 7) from USB


When you download something like the Windows 8 Developer Preview (which anybody can check out, not just developers), you're left with an ISO file that must be burned to a DVD before you can actually install it. Or must it?
The Windows 7 USB/DVD Download Tool lets you copy that ISO file to a flash drive, then use that drive to install Windows. And don't let the name fool you: although the 1MB utility says it's for Windows 7, it works like a charm with Windows 8. (Also notwithstanding its name, there's no real downloading involved.)
For this task you'll need a flash drive with at least 8GB of available storage. The utility will necessarily erase everything on the drive as part of the setup process, so make sure you've offloaded any important data. You'll also need to have downloaded the Windows 8 Developer Preview if you haven't already. I recommend the x64 version without the developer tools, though you may want to choose the x86 version if you're planning to install it on an older PC with limited RAM (i.e. 3GB or less).

Once you run the utility, it's a simple four-step process to select the ISO file, wipe the USB drive, make it bootable, and load Windows 8. So simple, in fact, that I'm not going to reiterate the steps here. But allow 10-20 minutes for the job to finish.
When you're done, you can "safely eject" the drive, then pop it into whatever PC is going to be your Windows 8 guinea pig. (If you have trouble booting from the drive, consult your manual; you may need to tweak the BIOS settings.)
I'm sorry to say you can't actually run Windows 8 from the flash drive like you can some versions of Linux; you'll have to go as far as to install it. But it'll be a lot faster going with the flash drive than it would be with a DVD. Plus, you can load it on a netbook, ultrabook, or any other system that lacks an optical drive.

Monday, May 9, 2011

Copying all the posts from one blog to another

Overview:

New Holland tractor with NH 850TL front loaderTo copy all the Posts from one blog to another, you need to export them from the first blog, and import the file that was created into the second file.

Any Pages (see The Difference between Posts and Pages) in the first blog, need to be moved individually, because pages aren't currently included in the export file.


If you want to totally replace the contents of the destination blog with the contents of the source blog, then you should delete the existing posts from the destination blog before you import the file.  (Delete posts by going tothe Posting / Edit Posts screen, and pressing the Delete button that is beside the post.   Don't delete the entire blog, or you will lose access to the URL).


Follow these steps to copy all posts from one blog to another:

1  Log in to Blogger.

2  Go to the export tab:
In the pre-Sept-2011 Blogger (ie the "old" interface) this is the  Settings / Basics tab.   OR
In the post-Sept-2011 Blogger (ie the "new" interface) this is the  Settings / Other tab.


3  Click on Export Blog.

Export-blog window on the old Blogger interface:
the new interface looks a little different, but has the same links

3a  If you are using the new interface, click Download Blog on the confirmation message window:


4  Your computer will download a file.   For Windows users, it will probably be put in the My Documents / Downloads file.  Or system may use another place, or may ask you where to put it.   Whatever happens, you will need to know where this file is saved to.

5  Open the blog that you want to move the posts to
(You may need to log out and in again, or perhaps just switch to different browser or tab)

Delete (using Posting / Edit Posts) any Posts that are already there, but which you don't want in the refreshed blog.

6  Go to Settings > Basics (old interface) or Settings > Other (new interface) again. This time, click Import Blog.  When the box opens, choose the exported file that you made earlier, and enter the security-text.
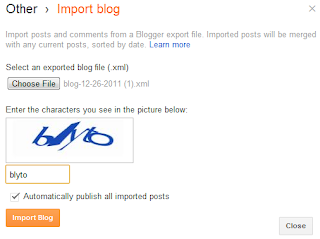
Import file selection screen in the new interface:
the old version of Blogger is very similar.

7  Choose whether or not to automatically publish all imported posts.  
Only tick the box if you DO want the posts automatically imported.   If you dont tick it, the posts will be loaded, but with have status of Draft, so won't be visible by readers until you publish them.

8  Click Import Blog.

Check that the import worked successfully, by looking at the blog, and also at the list of posts under Edit Posts:  are the right number of posts there, do they have the right labels etc.


Results:

IMG redCowRoadworks4586All the posts from the source blog will be copied to the destination blog.

They will have the same title and contents as they had before.

They will also have the same published-date that they had before.

Any comments from the source blog will also be copied over - sometimes it takes a few hours for the links for them to be re-establshed properly.

The URL for each post will be based on the URL of the blog you have imported them into and the publication-date that the posts had in the source blog - for example:
www.YourNewBlogName.blogspot.com /2009/05/name-based-on-post-title.html

Any internal links in the blog will still point to the post in the old blog
For example this link points to a popular article in Blogger-HAT.  
If I export-and-imported this post into a new blog, the link would still point to the same place, ie the post in Blogger-HAT - not to the post in the new blog.

Any pictures, videos etc in the old blog will still be in the same place that they were in (Picasa-web-albums, YouTube, Google Videos etc).

If you have imported more than the number of posts that Blogger allows per day (currently 50 I think) then to make any more posts today you will need to complete the captcha-test (ie entering the letters in the funny-shaped word).   This will go away approximately 24 hours after you last enter more that the maximum-posts-per-day.


Importing to the same blog:

If you try to import posts into the same blog that you exported them from, Blogger will not import any posts, and give you an error message.  

If you do want to do this (eg to create a duplicate set of posts), then do the export, change some small detail of the original posts title or date/time, and then do the import.

http://blogger-hints-and-tips.blogspot.com.au/2010/03/moving-all-posts-from-one-blog-to.html

Wednesday, July 7, 2010

How To: Watch Any Video on iPad, No Conversion Required

Thanks to its support of a single video format – MP4 – getting movies onto the iPad is, to be generous, a real pain. You can buy movies and TV shows from iTunes, but for most of the world that’s not possible.
So most of us find alternative sources, and then convert these AVI, DIVX and MKV files to MP4. This takes forever and pretty much puts your computer out of action as it gets red-hot and churns through the queue. It also lowers quality.
What if there were a way to almost instantly convert these movies, without any loss in quality? It turns out there is. The software is called Avidemux 2, and it is free on OS X, BSD, Linux and Windows.
AVI, DIVX and many other formats are no more than wrappers for the actual video content inside. Think of them as a book cover with a table-of-contents to help you find your way around. The covers may vary, but the wad of pages inside is the same. With almost all downloaded video, that “wad of pages” turns out to be in the iOS-compatible H.264 codec. What Avidemux does, essentially, is to swap out the covers, and make sure the new table-of-contents points to the right pages. The video inside remains untouched.
Confused? Here’s an example. I open up a video file in Avidemux. Let’s use The Wire, season two, episode one, a 367.4 MB AVI file. It offers to “Rebuild Frames” for me, so I click yes. This takes less around ten seconds. In the drop-downs on the left, I pick the audio (AAC) and video (MP4) formats, leaving everything else alone. Then I hit save (Command-S on the Mac) and give the file a name along with the extension MP4. This needs to be done manually – the software doesn’t name files automatically.
I click “Save” and this box pops up. Yes, that counter is accurate. Two minutes later I have a file that I can drop into iTunes and watch on my iPad. The video quality is unchanged from the original.
But that’s not very elegant, right? Who wants a file called The.Wire.2×01.Ebb.Tide.MP4 sitting it their library, with no cover art, no plot synopsis and no polish? For this, you need something like iFlicks.
iFlicks will convert video, but its main purpose is adding metadata. It parses the file name and then searches the internet, grabs the data and adds it to the file. This can then be sent to iTunes. Here it is in action (I have my Mac set up to automatically launch iFlicks when a new movie hits a certain folder):

If you’re lucky (ie. your file doesn’t have some really weird naming convention) then the metadata will be just right, down to the video kind being correctly set (in this case, TV Show instead of Movie). Then you add to iTunes. In this case, the fastest way is to pick “Flatten to QuickTime Movie” from the top-left pop-up, which effectively just sinks the metadata into the file and then iFlicks can send the result to iTunes. Sync with the iPad and you’re good to go.
Now, it is possible, apparently, to automate Avidemux to process a folder full of images instead of opening them by hand, one at a time. I couldn’t make it work, but I am currently working on a combined shell-script and Automator workflow to take care of everything from download to conversion, triggered by an RSS feed. The instructions for batch processing can be found in this MacRumors forum post.
Worth a quick mention here is one even simpler way to play AVI files on the iPad. Amazingly, Apple approved an app called YXPlayer which supports DIVX/XVID. WMV, H.264, WMV and others. It costs $5 and would seem to be a perfect app other than that most of the reviews says it sucks, running at a a maximum of 15 frames per second for video and rendering audio sometimes unlistenable. It costs $5.
Avidemux doesn’t work with every file, but it works with most, and is way faster and easier than the alternatives. Try it out. Avidemux 2 is free. IFlicks costs $23, with a free trial download, and runs on Mac OS X only.
Avidemux download [Avidemux.org]

http://www.wired.com/gadgetlab/2010/07/how-to-watch-any-video-on-ipad-no-conversion-required/

Tuesday, December 9, 2008

Handy little File Renaming tool

Here's a neat little piece of free software for renaming a batch of files

http://www.snapfiles.com/get/flashrenamer.html

Sunday, November 30, 2008

Have a Slow System? Try These Free Fixes

http://clicks.aweber.com/y/ct/?l=5LjSi&m=1ZMBKD4Fypu37q&b=Xjyj4NXlXdSkEQV0JNy2dg

Steve Bass's helpful tips.


Oh, my system is so slow

What do 300 files in the root folder and 2,500 temporary files have in common? Besides record-breaking events, they'll slow your system down to a crawl. Throw in a couple of rogue malware programs and a few gigabytes in your Internet cache folder, and you'll get better performance from the '486 in the closet.

You're laughing, sure, but the above examples are true and I'll bet you know someone with a machine with clogged folders. (And I wouldn't even dream of asking when you last did some PC housekeeping.)

I'll start with a sensible-shoes short course on how to rid your system of unnecessary files and maybe give it back some oomph. In another newsletter, I'll deal with your collection of malware and spyware.

Start by downloading and installing CCleaner. It's the smartest and safest program to get rid of files you don't need on your system. (When you get to the page, it's easier to download the tool from the Alternate Download location rather than from FileHippo.) As you install, de-select the first two items. You'll decrease desktop clutter and access CCleaner through the Recycle Bin icon (see screen below).

De-select these two items

for a cleaner installation.

Once you install and run the program, check boxes as shown on the two screen captures below. As you can see, CCleaner will take care of the temp files as well as the Internet cache folder; just ignore those apps you don't use. By the way, you can protect your privacy by selecting the History, Recently Typed URLs, and Last Download Location boxes. Be careful, though, and uncheck the Cookies box; otherwise you'll have to log into all your favorite Web sites all over again.
Here's how to setup CCleaner's deletion skills.

Now open CCleaner by right-clicking on the Recycle Bin and choosing Open CCleaner; then select Analyze and Run Cleaner.

The one thing CCleaner won't do is remove corrupted temporary files -- and those can create havoc. So spend another few minutes and clean the Temp folder again to delete these wonky files CCleaner can't handle. Click Start, Run, type %temp%, and press Enter. Press Ctrl-A to select all the files, and then press the Delete key.

While you're here cleaning house, check all your ActiveX files for corruption. This won't necessarily speed up your system, but it might help reduce system crashes. Here's how to do it: Click Start, Settings, Control Panel, Internet Options, choose the General tab, click Settings in Browsing history, and then click View Objects.

Delete every item that says anything except Installed or Unknown. Now right-click each "unknown" item and try to determine if it belongs to a program you can identify. If it doesn't, right-click and choose Remove it. Don't worry, Windows won't scold you. If your system needs the ActiveX control, it'll reinstall it.

Next, right-click each item and choose Update. (This is a one-item-at-a-time process.) Agree when the dialog asks if you want to download and install the updates.